【Factorio】How to Choose Railway Intersections (2.0 / Space Age Edition)
In Factorio 2.0, railway intersection flow depends far more on 'what you choose for your factory's scale' and 'how you place signals' than on the intersection shape itself. Written for beginners through intermediate players, this guide covers how to choose between T-junctions, crossings, roundabouts, and elevated rails in vanilla and Space Age.
【Factorio】How to Choose Railway Intersections (2.0 / Space Age Edition)
In Factorio 2.0, railway intersection flow depends far more on "what you choose for your factory's scale" and "how you place signals" than on the intersection shape itself. This guide covers how to choose between T-junctions, 4-way crossings, roundabouts, and elevated rails for vanilla and Space Age players—pitched at beginners through intermediate players who want to understand when to use each type.
I've made the mistake myself: right after upgrading to double-track, I built a 4-way crossing as a single block and could only ever get one train through at a time, creating constant gridlock. I fixed it by simply dividing the interior into four blocks with chain signals at the entrance and standard signals at the exit—and suddenly traffic flowed freely. The lesson stuck: intersections succeed because of waiting strategy, not flashy design. By the time you finish this guide, you'll know how to pick the right intersection for your throughput and get at least one working deadlock-free.
Railway Intersection Basics in Factorio: Lock Down Train Length and Direction First
Establish Double-Track Direction Across Your Entire Network
Before thinking about intersection shapes, pin down two things: single or double-track, and right-hand or left-hand traffic. This guide assumes Factorio 2.0 vanilla and Space Age. Older railway articles and outdated screenshots mix in v1.x mechanics heavily—especially 2.0's rail specification changes, which are risky to apply blindly.
Single-track saves rail materials early on and works fine for temporary supply lines. The catch: collision management and signal design explode in complexity, and the moment traffic grows, trains stack up waiting to pass each other. Intersection design shifts from "how do we safely separate directions" to "where do we even stop oncoming trains?" I've been there—I built my first factory on single-track, then had to relay entire networks when upgrading to double-track. Honestly, if you want stable intersections, start with double-track.
For double-track, commit to right-hand or left-hand traffic network-wide. Factorio stations and signals assume right-hand placement, so even in Japanese communities, right-hand orientation works more naturally in-game. Mix them by base and your templates stop being reusable—every branch, merge, and station entry becomes an exception.
2.0 upgraded rail orientation from 8 directions to 16, giving much more freedom for signal placement on curves. Older guides say "you can't place a signal on that curve" or "this merge needs extra spacing"—some of that has changed. But the degree of improvement varies by environment (mods, map settings, specific layouts), so confirm results in your own save. Some players report major improvements in branch/merge maneuverability, but it's not universally magical everywhere.
Define and Measure Your Maximum Train Length
Next, settle on a longest train composition that will run anywhere on your network. If you're standardizing on 1 locomotive + 4 cars (1-4), then every intersection size, station stop position, and waiting block must accommodate that. Skip this step and you'll end up with 1-2, 1-4, and 2-8 trains mixed together, causing the awful "signals are correct but everything still jams" failure mode.
For intersections especially, appearance matters far less than whether your longest train fits. The Factorio Wiki: Tutorial: Train signals((https://wiki.factorio.com/Tutorial:Train_signals/)) reinforces that block length must match your network's longest train—it's a core principle. When throughput is bad despite correct signals, the culprit is often composition miscalculation, not signal design.
The safest method: place your actual train composition in-game and use its footprint as your standard. One detail that helps: Railway - Factorio Wiki(https://wiki.factorio.com/Rail/) notes that rails are placed in 2-tile increments. When tuning intersections and block lengths, thinking in 2-tile steps keeps designs stable. I once tweaked a blueprint and ended up with an exit block that was oddly short—numbers looked fine on paper, but accumulated half-tiles meant the last car hung in the intersection.
The "longest train" here means the largest composition that could ever use your network, not your usual one. If ore trains run long but liquid trains run short, size intersections for the long option. Intersections are shared infrastructure; if only a few long trains break the rules, the whole network bottlenecks.

Tutorial:Train signals
wiki.factorio.comStandardize Block Length and Exit Buffer Space
With longest composition locked in, use that length to establish standard block length and exit buffer space. Intersections typically use chain signals (linked) at entry and standard signals at exit, but that only works if the exit section has room for trains to fully clear. If the exit block is too short, the front clears while the rear still sits in the intersection—blocking every other direction.
The rule is straightforward: your exit block after an intersection must fit your longest train completely. In other words, don't leave the last car in the intersection. Toss in a safety margin and you'll run more smoothly in practice. Even a pristine 4-way crossing or roundabout becomes a deadlock risk if you violate this rule.
💡 Tip
My worst jam: a 1-4 train with an exit block too short. The front cleared the intersection but the rear barely stayed inside, so no direction ever turned green. I extended the exit by train-length plus buffer—the gridlock vanished instantly.
This principle holds across T-junctions, 4-ways, roundabouts, and everything else. You can fine-tune intersection internals for throughput, but if the exit gets clogged, all that cleverness is wasted. Think of internal division as the engine and exit length as the chassis—you need both.
Space Age adds elevated rails to reduce plane-level crossings, but even high-level ramps and ground stations need buffer zones. Being able to solve everything with elevated track is a myth—lock in where your longest train fits before choosing a shape, whether ground or sky. Once that's fixed, picking intersections becomes less "which do I like" and more "can this one keep its exit clear."
Railway Intersection Patterns: T-Junctions, 4-Ways, Roundabouts, Elevated Rails
T-Junctions: Excellent for Branch Connections
T-junctions are the most natural fit for feeding a branch line into a main line—ore bases, oil outposts, anywhere you add a spur. Space demand stays small to medium and you avoid extra complexity, so they're super practical from early game through mid-game. I still use T-junctions first when adding mining branches to the main trunk.
Signal difficulty is medium. Follow the rule above: chain signals at entry, standard at exit, no trains stuck in the middle. T-junctions have fewer route combinations than 4-ways, so they're easier to reason through; plus 2.0's curve freedom really helps branch/merge layout. Old-school designs that looked cramped often work fine now.
Simultaneous throughput is medium. A branch feeding in while the main line continues straight will flow nicely if paths are clean, but a weak exit buffer causes instant gridlock. The tricky part: stacking T-junctions too close together creates a de facto large intersection. Visually small, but operationally you've glued two separate intersections into one bloated mess. It's incredibly common.
Best for: early to mid-game, and as branch feeders even at scale. Once you're running dual mains, T-junctions shift to support roles. 2.0 vanilla treats them very kindly, and Space Age (without elevation) keeps them viable for ground branch connections.
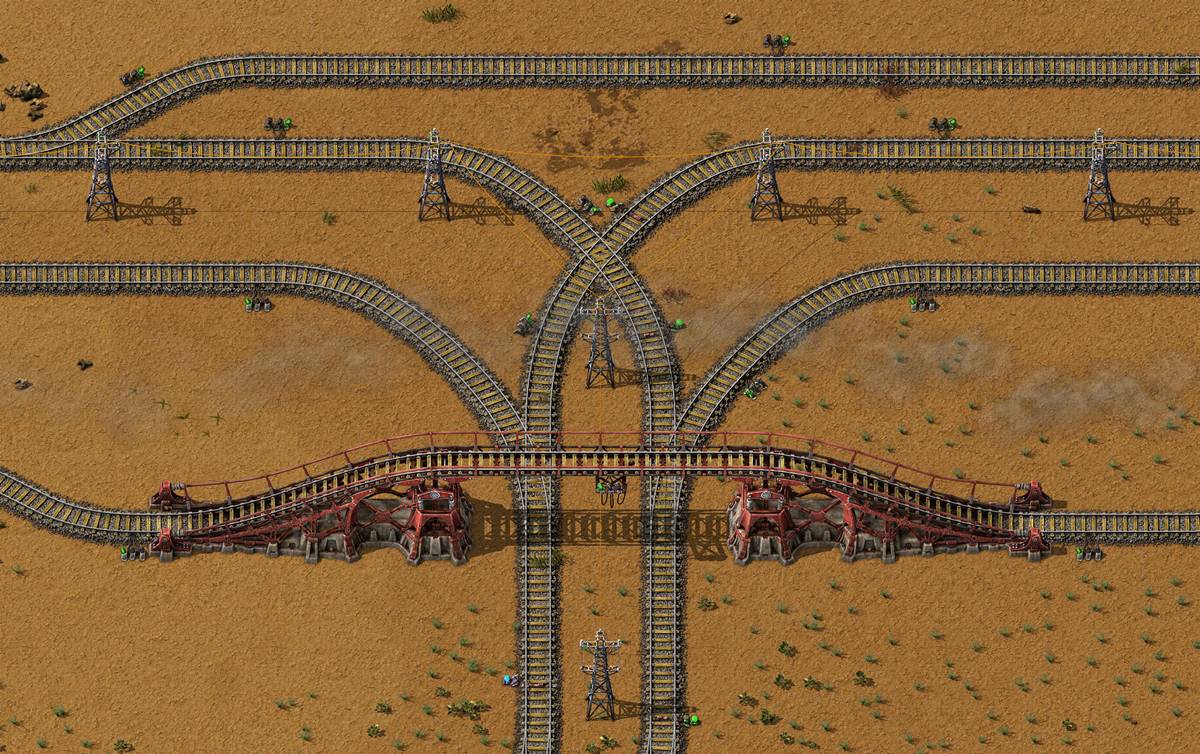
4-Way Crossings: Main-Line Workhorse—Internal Block Division Is the Key
4-way crossings are the main-line specialist. When east-west and north-south trunks meet, you outgrow T-junctions and 4-ways become mandatory. Space demand is medium; signal difficulty is medium to high. The shape is intuitive, but a single block interior tanks throughput hard—that was my gridlock when I upgraded. Only one train moves at a time.
The 4-way's real value is internal block subdivision. Split the interior so non-colliding paths occupy separate blocks and more trains cross simultaneously. For instance, certain straight-throughs and turns can share block-free zones. Theory is simple; execution trips people up because figuring out "which paths fight" takes practice.
The factorio@jp Wiki intersection examples(https://wikiwiki.jp/factorio/%E5%88%97%E8%BB%8A%E3%83%8D%E3%83%83%E3%83%88%E3%83%AF%E3%83%BC%E3%82%AF/%E9%85%8D%E7%BD%AE%E4%BE%8B) help visualize this—though remember old versions and outdated images float around. For 2.0+, use them as concept references, not templates. Read for block-subdivision strategy, not layout copy-paste.
Simultaneous passage is high among the four types. No guarantees about precise performance rankings, but for main-to-main duty, a well-divided 4-way is very reliable. My experience: interior reorganization does the heavy lifting. A big 4-way gridlocked; split it and queues evaporate. Small visual changes, huge flow difference.
Best for: mid-game onward, especially large-scale. When routes multiply, you can't dodge 4-ways forever. 2.0 vanilla handles them great, and they stay critical in Space Age ground networks even where elevated rails exist. You won't elevate everything—ground 4-ways sorted properly still do real work.
Roundabouts: Intuitive but Struggles Under High Volume
Roundabouts are visually intuitive, low to medium difficulty, so they're amazing for "finally building something that works" moments. Space is medium; merges and branches tuck neatly into the loop. Community examples love them, and yes, they feel right to build.
Big caveat: intuitive design and high throughput are different beasts. Roundabouts resist bottlenecks at low to medium traffic; ramp up volume and the ring becomes the bottleneck itself. Mid-game they're lifesavers; late-game they become pinch points. My own play: roundabouts tide me over until trains multiply, then choke and need replacement. I'd eventually drop in a 4-way with interior blocks and exit buffers—suddenly stable.
Signal setup is cleaner than 4-ways but still needs internal division. Make the loop one big block and one train entering locks everyone else out, negating the circular advantage. Carve it up, sure—but if the exit buffer is starved, gridlock moves from the loop to the exit ramp. You're still "let in only trains that can fully exit," just with a prettier shape.
Best for: early to mid-game. Large-scale? Roundabouts work as _branch coordinators_ or _light intersections_; main-line throughput bottlenecks happen. 2.0 made curves easier but didn't make roundabouts suddenly bulletproof. Easier to build ≠ infinitely capable.
💡 Tip
Roundabout gridlock usually traces to exit overflow, not loop design. Fix the buffer space before redesigning the ring.
Elevated Intersections: Space Age Only—Simplify by Eliminating Plane Crossings
Elevated intersections are Space Age exclusive. They excel by reducing plane-level collisions, letting you sidestep intersection complexity entirely. Where ground logic is "manage this crossing with signals," elevation says "don't cross at all." Simultaneous passage is high, and sight lines are clearer.
The tradeoff: space is large, structure is heavier, and you need ramp logic, ground station ties, and layout-wide routing. Signal difficulty isn't always worse than tangled ground 4-ways, but overall complexity spreads across your whole network design. Not a cheat code, just a tool.
Best for: mid-game onward, especially at scale. When ground intersections exhaust you and plane-level traffic management feels impossible, elevation pays off. Large networks benefit most—"handle collisions" beats "eliminate them" less the bigger you are.
Space Age and 2.0 vanilla are separate evolutions. 2.0 improved ground rail freedom; Space Age adds "don't intersect" as an option. Ground T-junctions, 4-ways, and roundabouts are the 2.0 foundation; elevated rails are the Space Age upgrade. Rail - Factorio Wiki and factorio@jp network examples side-by-side show the split clearly.
Here's a quick table comparing the four:
| Type | Space | Signal Difficulty | Simultaneous Passage | Best For | 2.0/Space Age Ease | Cautions |
|---|---|---|---|---|---|---|
| T-junction | Small–Medium | Medium | Medium | Early–mid, branches | 2.0 branch/merge is smooth. Space Age ground branches still useful. | Stacking creates mega-intersections. |
| 4-way | Medium | Medium–High | High | Mid–large, mains | 2.0's 16-direction greatly eases interior block cuts. Space Age ground mains still critical. | Single-block fails. Interior division mandatory. |
| Roundabout | Medium | Low–Medium | Medium | Early–mid, general | 2.0 easier to build. Space Age ground bypasses still handy. | Ring bottlenecks under heavy load. |
| Elevated | Large | Medium | High | Mid–large scale | Space Age only. Fewer ground conflicts = simpler control. | Uses area; whole-network layout impacts design. |
(Note: This table shows general patterns, not precise performance rankings. Real throughput varies with rail length, curve radius, block finesse, train composition, and operations. Design with these as guides, then verify your setup with your own trains and signals.)
Rail - Factorio Wiki
wiki.factorio.comSignal Fundamentals: Chain Signals at Entry, Standard at Exit
Standard vs. Chain Signal Logic
The core intersection rule, whether T-junction or 4-way: chain signals (linked) at entry, standard signals at exit. Same for every pattern. This isn't about collisions—it's about preventing trains from getting stuck in the intersection itself.
Standard signals check if the immediate next block is clear. If yes, they let a train in even if the exit is clogged—so the train parks in the middle and blocks everyone else. Nasty spiral.
Chain signals look ahead through multiple blocks to see if a complete path to the exit is viable. They only green a train if it can genuinely clear the intersection. Entry now happens further back, upstream. Critical difference: a gridlocked network where trains pile outside the intersection recovers much faster than one where trains pile _inside_.
I had exactly this problem early on: standard signal at entry, 1-4 train stops mid-intersection, other directions can't move, entire network deadlocks. Swapped the entry to chain—trains stopped before the intersection, not in it. One-word change, night-and-day difference. Tutorial: Train signals - Factorio Wiki shows this principle is fundamental.
Subdividing Intersections for Parallel Flow
Entry chain + exit standard is safe but not maximal throughput. Next step: divide the interior into multiple blocks so non-colliding paths can run parallel. A single monolithic intersection means one train anywhere locks everyone out. Carve it smartly and simultaneous entries spike.
For instance, opposite-direction straights or certain turn combos can be independent blocks. In theory, you get as many concurrent trains as independent blocks—in practice, shape and flows matter, but you're no longer "one train at a time."
This mindset applies to all four types and scales. The point isn't size; it's expressing which paths collide and which don't via signal placement. The "single-block 4-way never scaled" earlier? Interior blocks are why upgrades work. 2.0's 16-direction curves made this subdivision much easier to physically arrange.
💡 Tip
Intersection safety is really about pushing the _stop point outside_ the intersection. One train waiting upstream instead of midway means the next train has an escape route and recovery is fast.
Minimal Viable Configuration
Simplest setup: chain signal on every entry lane, standard signal right after the intersection clears. Just that baseline stops mid-intersection camping cold. I always start new intersections here, not with fancy internals—simplicity lets you see what's actually colliding.
Then, if throughput needs growth, drop interior signals to carve independent zones. Keep entry chain and exit standard sacred; flip entry back to standard and you invite center-camping again, undoing all interior work.
Real layouts need exit buffer too. A train clears the signal only to have its rear carriage hang in the intersection means interior division gains nothing—the intersection is still occupied. True clearance = caboose is fully past all crossing paths.
This minimal form is unsexy but bulletproof. Get it working everywhere first, then layer optimization. Stuck on signals? Strip back to entry-chain + exit-standard. Usually, you've broken that rule somewhere.
Pattern-Specific Builds and When to Use Them
T-Junction: Basic Steps
T-junctions excel at main-line + branch setups: mining outposts, refining spurs, supply drops. Keep the straight main flowing; add merges and splits on the side. My early expansion always defaulted to T-junctions—stability with less brain-load than 4-way arithmetic.
Build process: preserve the main straight, design the branch merge/split, then apply entry chain + exit standard. T's are small enough that laziness is tempting—just remember exit buffer space is still critical. Branch feeding in + main exiting can block each other fast.
One pitfall: stacking T-junctions without spacing. The rear of one train reaches the next split and occupies multiple "separate" junctions at once, creating a phantom mega-intersection. I've done this repeatedly. Spacing and buffer management matter as much as the T-shape itself.
4-Way: Basic Steps
4-ways are the real workhorse. When two trunks cross, T-junctions stop working and you're here. Design hinges on interior block division. Entry chain + exit standard is mandatory, but that baseline alone gives you "one train per cycle." To unlock parallel throughput, you must split the center intelligently.
Key: identify which paths _don't_ collide and assign them different blocks. Opposite straights, certain pairs of turns—whatever can coexist, carve out. 2.0's curve signal freedom makes this doable where v1.x was fiddly.
Then extend exits properly. Each direction needs a full-train-length buffer or late-arriving carriages hang in the intersection. This overhead looks wasteful but is foundational.
factorio@jp's network examples show working 4-ways, though as noted, older revisions exist. The principle—interior block subdivision and generous exits—is the lesson, not pixel-perfect replication.
Roundabouts: Subdivision and Limits
Roundabouts feel forgiving because loops are intuitive. Therein lies the trap: "I built a roundabout and it worked!" ≠ "roundabouts scale infinitely." Entry and exit (chain + standard) still apply, and interior blocks still matter. A loop as one fat block = one train permitted anywhere = no advantage over a simple 4-way.
Carve the loop into multiple blocks tied to entry/exit zones. This helps but doesn't magically fix gridlock; increasing traffic eventually saturates the ring itself, and no signal reshuffling saves you. When you hit that wall, throughput stalls and replacement (often to a 4-way with proper internals) becomes simpler than endless tweaking.
Roundabout fatigue symptoms: same directions always waiting, ring perpetually full during rush hours, output side backs up. Signal micro-tuning won't fix fundamental ring bottlenecks; you're past the design's ability to scale.
💡 Tip
Roundabout problems usually point to output buffer shortage, not ring geometry. Before overhaul, confirm the exit is actually starved.
Elevated: Layer Separation Patterns
Elevated intersections are Space Age-only tools to skip ground collisions entirely. Unlike shapes, this is more about routing philosophy: main flow on ground, cross-flow elevated (or vice versa).
Basic pattern: primary direction(s) ground-level unobstructed, secondary directions elevated. Example: east-west main line straight through ground, north-south crossing overhead. Busiest flow moves uninterrupted; lesser traffic takes the ramp penalty. For mixed volume, this asymmetry often works well.
Alternatively, cluster one busy direction elevated while keeping others ground. Depends on your traffic shape. First iteration: put the unidirectional bulk traffic where it never waits, ramp everything else around it.
Elevated doesn't eliminate signals—ramps and ground stations still need control. But plane-level conflicts drop dramatically. A 4-way gridlock at ground level becomes a side-problem you can ignore. That perspective shift is where high-scale players feel the biggest relief.
Common Failure Modes: Deadlock, Undersized Blocks, Overcrowded Spacing
Center-Intersection Stalls
Novice trap #1: standard signals at entry, near-monolithic interior. Trains enter and stop in the crossing, blocking perpendicular flow, which blocks other routes, and you get mutual wait-locks. I've watched entire networks grind to halt this way. Confusion because signals are installed, so it _should_ work.
Fix: entry chain signals + interior splits. Trains wait upstream, not onsite.
One hidden gotcha: station/signal orientation. Factorio assumes right-side placement for stations and signal detection. Swap sides and one direction works while the other silently fails. Single-track + bidirectional = recipe for alignment disasters. Saw my own early builds where one direction never triggered the station correctly.
Exit Buffer Starvation
Gridlock where trains are visible partially out: front exited, rear in intersection. Aha—exit block too short. Caboose hangs inside; intersection stays occupied; no direction gets green. Trivial fix: extend the exit to fit full length + margin.
This is _the_ hidden killer because signal logic is correct. The problem isn't signals—it's real estate. Signal tweaks won't help. You need more track past the intersection.
Self-check: watch a stopped train at gridlock. If the rear is over any crossing point, you've found it. Extend the straight section. Crisis solved.
💡 Tip
Exit signal placement = "the point where the entire train (including caboose) is past all conflict zones," not "where it looks pretty."
T-Junction Stacking and Cascade Gridlock
T-junctions spaced too close become a de facto large intersection. One train occupies multiple junctions; waiting cascades; everything jams. Visually small, operationally a nightmare.
Spacing rule: leave at least one train-length between T-junctions. Better yet, recognize when you're feeding multiple branches—that's a clue you might need a bigger intersection rather than chained T's.
2.0's improved curves let you route around this, so if stacking seems forced, consider an alternate path or junction consolidation.
Single-Track Limits and Double-Track Pivot
Single-track is tempting: less material, smaller footprint, works early. It crumbles once you scale. Passing sidings become management nightmares, and station entry conflicts explode. The system works until it doesn't, then fails everywhere at once.
Double-track from the start saves redesign. Or, know when to transition: small outposts can stay single; main transport should double as soon as you're adding >1–2 trains per route.
Signal complexity in single-track is underestimated—bidi control, siding logic, collision avoidance = messy. Dual-track signal rules are cleaner.
What Changed in Factorio 2.0 and Space Age
2.0's 16-Direction Rails and Signal Placement Freedom
2.0 escalated rail direction resolution from 8 to 16 points. Sounds cosmetic; it's mechanically huge. Signal placement on curves became far more flexible.
v1.x forced awkward compromises: can't place a signal exactly where you want on a curve → bleed out block sizes → lose interior subdivision efficiency. 2.0 let you _place_ where needed, so interior blocks tighten and throughput improves.
Self-experience: 4-way internals, especially curves, went from "negotiate" to "natural." The bottleneck shifted away from "can I place a signal here" to "does this path actually split the way I want?"
Zero to Hero: Factorio Railway Construction (Convenience Features) reflects these changes. Old guides often worked around constraints no longer needed. Spot those workarounds and simplify.
Zero to Hero: Factorio Railway Construction (Convenience Features) - Stone Bridge Smashing Page
www.jias.jp2.0 Branch/Merge Maneuverability
2.0 also eased parallel-line branching and merging. v1.x demanded wide gaps between dual tracks to squeeze splits/joins. Now, gaps shrink and splits tighten naturally.
Ripple effect: nearby intersections stop fighting for space, queuing pressure drops, and you avoid the "consecutive-T cascade" trap more organically.
I literally felt this in practice—designs that required detours now fit cleanly. Less "work around geometry," more "plug and play."
Space Age Elevated Rails
Space Age added elevated tracks. This is distinct from 2.0's ground improvements. The expansion (released October 21, 2024) lets you stack layers to dodge collisions entirely.
Elegance: instead of signal expertise to resolve conflicts, just... don't intersect. Ground signal optimization becomes secondary once you split flows vertically. Huge relief at scale.
Felt most in the shift from "solve this crossing" to "this doesn't need solving." Large networks cry out for it. AUTOMATON's elevated rail coverage echoed fan excitement for good reason—it reframes the problem.
Factorio DLC: 'You Can Lift the Tracks'—Elevated Rails Finally Arrive
The official Wube Software announcement of elevated rail coming to Space Age DLC.
automaton-media.comReading Old Guides: Version Gaps
Older railway content often blurs 2.0 vanilla and Space Age eras. Squint and you'll misread which constraints were real and which are relics.
Watch for:
- Curve signal placement: v1.x was cramped; 2.0 loosened it. Older guides' wide spacing wasn't always needed.
- Parallel-line gaps: Same story—old guides erred wide; 2.0 allows tighter.
- Elevated designs: Those are Space Age-specific. Don't confuse 2.0 improvements with elevation benefits.
The principle: 2.0 = ground rail got way more pleasant, Space Age = ignore ground conflicts via elevation. Rail - Factorio Wiki grounds this distinction clearly.
Practical takeaway for old content: read for reasoning, not blueprint copy-paste. "Why did they space this wide?" → "v1.x required it, but 2.0 doesn't"—now you know when to compress.
Getting Started: Build Standards First
Before placing intersections, nail down your standards:
- Throughput and direction: double-track, right-hand or left-hand network-wide.
- Composition: longest train ever.
- Intersection rule: chain entry, standard exit, always.
- Block baseline: intersection interior divided by conflict; exits big enough for full trains + buffer.
Pick one primary intersection type—T for branches, 4-way for mains—and stick with it. Consistency beats shape variety. Once the rules are muscle memory, you'll debug faster and build smoother.
Your first goal: a small test loop with one intersection, run trains through it, confirm zero deadlocks. Then replicate that design. Predictability beats perfection.
Note: This site's internal articles are still being written; linked references are placeholders. For current guidance, consult the official Factorio Wiki: Train signals(https://wiki.factorio.com/Tutorial:Train_signals/) and Rail pages(https://wiki.factorio.com/Rail/), plus factorio@jp network examples(https://wikiwiki.jp/factorio/%E5%88%97%E8%BB%8A%E3%83%8D%E3%83%83%E3%83%88%E3%83%AF%E3%83%BC%E3%82%AF/) for Japanese community reference.
RinSeo
Over 2,000 hours in Factorio. Shares practical logistics and defense know-how drawn from managing train networks with 100+ stations and completing Death World marathon runs.
Related Articles
Factorio Logistics Guide | Belt vs Train vs Robot - When to Use Each
Factorio Logistics Guide | Belt vs Train vs Robot - When to Use Each
Factorio Train Schedule Setup and Automation [2.0 Compatible]
Factorio Train Schedule Setup and Automation [2.0 Compatible]
Mastering Factorio Train Signals and Network Building
Mastering Factorio Train Signals and Network Building
Factorio Train Signals Fundamentals | Standard vs. Chain Signals and Blocks